Playgrounds are eerily empty during the day. Yellow school buses dominate in the mornings and afternoons. Traffic is a nightmare within a one mile radius of campus. What does that mean? School’s back in! And among this year’s eager, bustling mob of students is my own dear husband, who after graduating college a number of years ago, has gone back to school to become an architect. Long hours in the studio accompany any architecture student’s schedule – my first concern with this, of course, is keeping him fed.
Flavors
His first request was cookies. Easy! I can’t screw that up, right? I came up with what I thought to be a delicious, foolproof recipe for double chocolate cookies. But somehow, someway, I managed to produce the blandest, chalkiest, ugliest cookies I think I’ve ever made. “Umm, are you sure you got the measurements right?” my husband gently inquired when they came out of the oven. I even think one of his fellow students referred to them as “turd piles” at one point. Lovely. Regardless, he took them to campus and ate them in the studio (when no one was looking). After my embarrassing cookie calamity, I was determined to right my wrong.
Raspberry season generally runs from May to November. For whatever reason, I’ve seen a sudden outcrop in the availability of raspberries in the area, both at the Farmers’ Market and at grocery stores. There were some especially plump, juicy ones at Saturday’s Farmers’ Market, so I was sure to pick some up. Lingering on my chocolate idea, I knew that the addition of raspberries would not only be classic, but delicious.
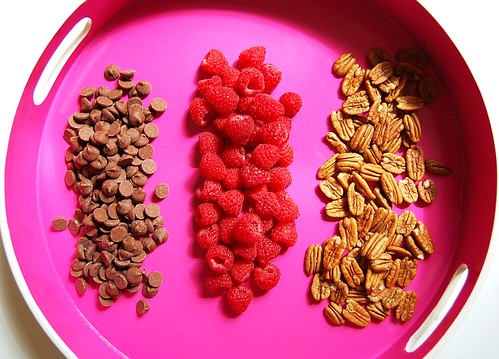
In keeping with the snack theme, I opted for something that resembles a granola bar in size and ingredients, but has the consistency and flavor of a cookie. I started by mixing my dry ingredients, which are typical for a run-of-the-mill granola bar: flour, oats, sugar, brown sugar and nuts. To enhance the flavor and decadence of these bars, I added cocoa powder and chocolate chips to the mix. Pouring in melted butter turns the dry ingredients into a moist crumble, which I pressed into the bottom of a parchment-lined jelly roll pan.
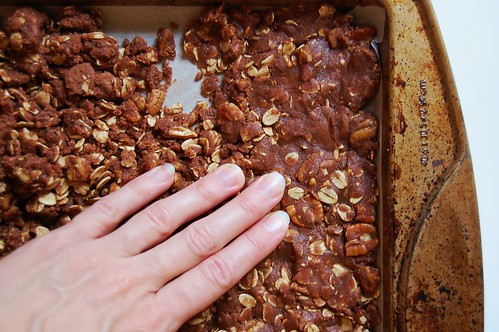
Pressing the Dough
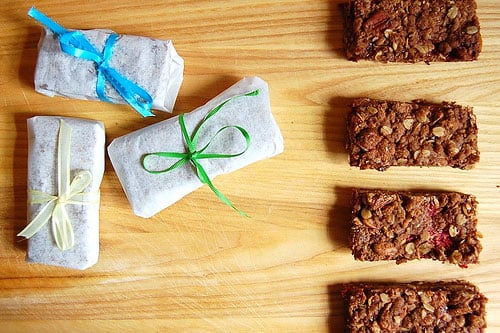
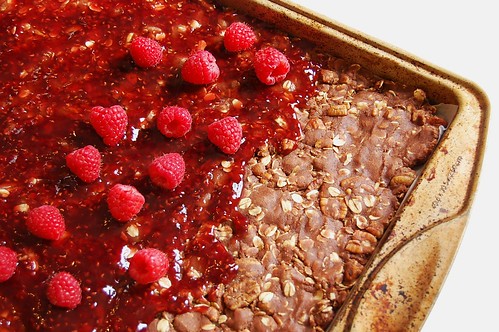
I spread my favorite raspberry preserves on top of the pressed dough; for those who are feeling ambitious and so inclined, try making your own following my jam recipe from this spring. I then topped the preserves with my Farmers’ Market raspberries. To get these little gems to lay flat, you have to do some squishing and mashing, which ends up looking like a raspberry massacre of sorts, but no worries – the end result is worth it. Topped with the remaining dough, the pan went into the oven for just under 45 minutes, until the bars were slightly puffed and delightfully fragrant. After letting them cool completely, I cut them into bars.
The crumbliness of these bars is buttery and soft, the chocolate is sinful and the raspberries add an intensely sweet kick. These bars are great for a midday snack or a little dessert after lunch. Better yet, top them with your favorite vanilla ice cream and have a decadent timeout, any time of day. Enjoy!
Chocolate Raspberry Bars
(makes about 25 bars)
3 c. all-purpose flour
1/2 c. cocoa powder
2 1/2 c. rolled oats
2/3 c. sugar
2/3 c. packed brown sugar
1 tsp. salt
1 tsp. baking soda
2 c. toasted pecans, coarsely chopped
1 1/2 c. milk chocolate chips
3 sticks of butter, melted
1 jar (13 oz.) raspberry preserves
1 pint raspberries
Preheat the oven to 350°. Line a large jellyroll pan with parchment paper and set aside.
In a large mixing bowl, combine the flour, cocoa, oats, sugar, brown sugar, salt and baking soda. Using a whisk, combine the ingredients well. Stir in the pecans and chocolate chips. Using a large spoon, stir the melted butter into the oat mixture until thoroughly combined and crumbly.
Layers
Press just over half of the oat mixture into the bottom of the jellyroll pan, using your fingers to ensure the dough is evenly distributed. Spread the preserves over the dough and top with raspberries, gently smashing the raspberries to flatten them. Crumble the remaining dough over the raspberry layer and gently press.
Bake the pan for 40-45 minutes, rotating the pan halfway through baking. Remove from the oven and allow to cool completely (or refrigerate for quicker cooling). Cut into bars and store in the refrigerator for up to one week. Bars can also be frozen for up to one month.
If the above slideshow doesn’t load, please visit the entire set on our Flickr page.
Laura Hobbs is a guest contributor for the Fayetteville Flyer. Born and raised in Fayetteville, Laura is a self-proclaimed foodie and avid cook. For more of Laura’s contributions, visit her author page.